When San Francisco’s muni system was having its computer troubles, they decided to put a real time display of what the system operator sees on the terminal – onto the internet, so irate passengers could appreciate what was going on. If you’re a streetcar/computer geek like me, this is very interesting to watch for hours on end – if you’re not, you’ll probably find it really boring.
The display is a bit spartan, since the system operator knows what it means. Here is a typical display with a little annotation and explanation:
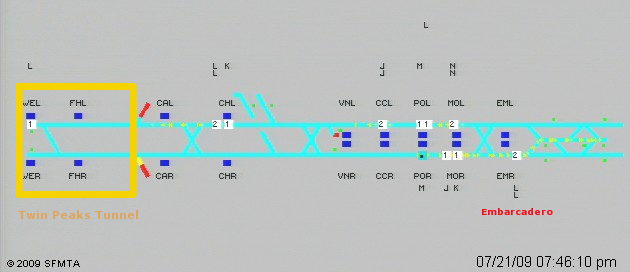
West is to the left, north is to the top, although the tunnel is not actually straight nor perfectly east/west. This is a typical railroad dispatcher control display – it is showing the relative position of important things it is controlling. Actual distances also are compressed and not proportional.
Here is an overall system map to help figure things out:

The Market Stree subway runs from the Embarcadero station to the East Portal of the Twin Peaks Tunnel. Twin Peaks Tunnel was built in 1918 – the subway was started in the 1960s, The two red lines near the CAL/CAR are interconnections with the surface line on Market Street. Prior to the opening of the subway, that is how streetcars temporary got into the Twin Peaks tunnel while the subway was being built. They are now used only in an emergency or infrequent transfers of equipment.
Each train in the subway shows up on the blue lines as a number, which indicates the number of cars in the train. .
Above/below the lines are the station designators, with the L/R at the end indicated Left vs Right. The Blue rectangles are the platforms. The 5 eastern ones are center loading platforms, and the outer 4 have separate platforms on each side of the tracks.
Up above/below the station designators is the route designation of each train… J, K, L, M, N,T. If the letter is in black, the train is operating under computer control. If it turns Yellow or white, the train is on manual operations.
It is normal practice in the subway to join together cars from trains going to different destinations to get more trains through the subway. When the trains reach West Portal, the combined trains are decoupled and go their own ways. If you ride Muni, you want to be sure you get on the correct car 
In this example, there are 2 trains both at platform POL, but they are not coupled. That’s why the L is waaay up high on the display. If they were coupled together, the display would show ML.
The yellow dots indicate the path that the train is going to take.
Now for some other situations:

When the train icon turns red, that means the brakes are being applied (WEL/WER). When the number changes to a dot, that means the doors are open in the station (EMR).
The N and J trains don’t go through the Twin Peaks Tunnel. The 2 car N train just east of CHL is coming in off the street, and about to join the mainline. The N train East of the Embarcadero has gone beyond the turnaround tracks and is headed out of the tunnel to begin street running. The T line also goes beyond the tunnel, runing down the East side of downtown to serve the AT&T Baseball stadium and connect with Caltrans station, which provides commuter rail service to the Southern suburbs, and then continues in the new 3rd Street Cooridor to connect to another CalTrans station that has never been built because Muni and Caltrans don’t talk to each other, and CalTrans wanted money to double track their lines into the station at 4th and King. [Do you really want the government running your health insurance?]
If the Giants are in town, look for a lot of extra N/T(K) trains. “T” trains show up as “K” because the control system software has not been updated yet.

The train circled in red is a 2 car train – JX… The X indicates that the train is going out of service (I think – it’s now 8:30 PM and rush hour is long ago over)

This image captures a few more interesting things:
The station platform at EMR has turned yellow. There are two trains at the station – a 1 car M train going into the Y to switch directions, and a 2 car NN train that is going straight and about to leave the tunnel heading east (then south). The Yellow indicates that the Dispatcher is holding the train at the station even though the train could proceed.
A common problem in all transit is “bunching”. If a train (or bus) gets too close to the one in front of it, fewer passengers will have shown up at the stops. If the train/bus picks up nobody it spends less time stopped, and will get even closer to the one in front of it, and you can wind up with one train/bus filled to capacity followed by 3 completely empty trains/bus.
An experienced driver knows his/her job is to stay on schedule, not to “go as fast as I can”, even if the passengers yell at you to go faster. Knowing that issue, you can often save yourself a lot of grief during rush hour, by letting the first train/bus go by if it is completely packed. More than likely, another one that is almost completely empty is right behind it with lots of empty seats. It pays to know human nature
Over of the right side, a 2 car NN train has just entered the system. It’s train indicator is yellow indicating that the train is also being “held”. There is a 1 car “L” train in front if it on “Manual”.
A more detailed description can be found here.